Windows and Linux have been adversaries since ages. But there have been good hearted programmers out there who have made it easier for common folks to use Windows applications on Linux Wine. And now, Window 10’s Anniversary update brings you a full, Ubuntu based Bash shell that can run Linux software directly on Windows. Previously, Windows users had use Cygwin to emulate bash on Windows 10 or other versions, which is good but is not quite what Windows users wanted.
Ubuntu Bash shell in Windows can be thought of as opposite to Wine. Microsoft has collaborated with Canonical (folks who develop Ubuntu) to offer a full Ubuntu based Bash shell that runs directly on Windows 10 using the Linux subsystem for Windows 10. But mind you, there is no virtual machine stuff going in the background, it is running directly on Windows.
That being said, this is not real Linux. The Linux kernel is not available here. Instead, Linux subsystem for Windows 10 allows you to run the Bash shell on Windows 10 with the exact same binaries you would normally run on Ubuntu Linux.
The Bash shell on Windows 10 will get you close to the experience of working on Linux systems. In case you are wondering, here is how you can install and enable bash on Windows 10.
Enable Bash on Windows 10
1. To install and enable bash on Windows 10, you should have a 64-bit system with the Anniversary update installed. Once you have these things set, you need to enable the Developer Mode. To do that, press Win + I to open the Settings app. Here, navigate to “Update and Security > For Developers” and select the radio button “Developer Mode” under the Use Developer Features section.
Also read: how to enable dark mode in Windows 10

2. Now, press Win + R to open the Run dialog box. Here, enter optionalfeatures.exe and press the enter button. This action will open the Windows Features window.

3. Here, select the check box next to “Windows Subsystem for Linux (Beta)” option in the list and then click on the button “Ok” to save the changes.

4. As soon as you do that, Windows will apply the changes and asks you to reboot your system. Simply save all your work and click on the button “Restart Now” to reboot your machine.

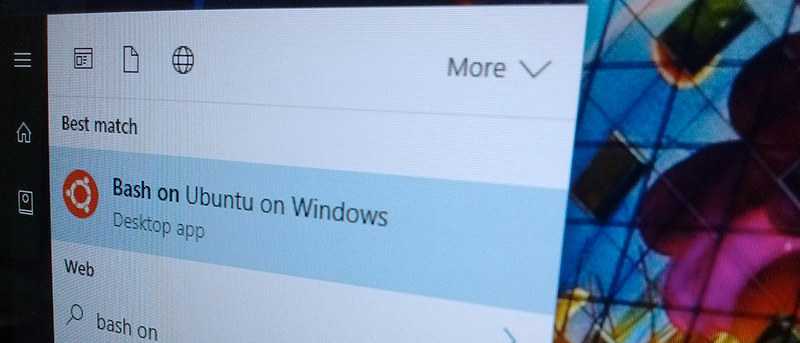
5. Once your machine restarts, click Start button, search for “bash” and press the Enter button on your keyboard.

6. When the bash command prompt opens, press the Y key on your keyboard and then press the enter button.

7. This action will download and install the Bash on Ubuntu on Windows 10 from the Windows Store. The download size is anywhere from 300MB to 400MB. So sit back and wait while Windows installs bash on Windows 10.

8. Once Windows completed installing bash on Windows 10, it will ask you to enter a new username and password. Simply enter the username and password of your choice and you are good to go.

Enable Bash on Windows 10 – Conclusion
From this point forward you can use almost all the Linux commands and even the SSH directly from Windows using bash on Windows 10.

In case you are wondering, you can open bash on Windows 10 by searching for “bash on Windows 10” in the Windows 10 Start menu.

Hope that helps and do comment below sharing your thoughts and experiences about installing and enabling bash on Windows 10 and how you’ve been using bash on Windows 10.